![]()
M3 Stuart Light Tanks
|
|
|
|
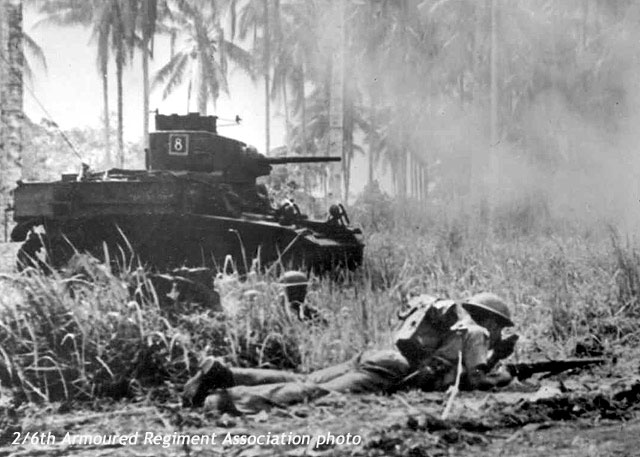
A Stuart at Giropa Point during the attacks of late December 1942. This tank lacks the hull stowage box on the front right of the vehicle. |
![]()
The M3 Light Tank series were the first vehicles delivered to Australia during
the Second World War under the Lend Lease scheme. They were also the first tanks
used by an Australian armoured unit in the jungle against the Japanese in New
Guinea in late 1942. Australia received both M3 and M3A1 types, and both petrol
and diesel engined versions.
![]()
The Stuart was the first of the lend-lease armoured vehicles supplied to
Australia by Britain (from US stocks), with the first vehicles arriving in
Puckapunyal late in 1941. The Stuart eventually equipped several of the units of
the 1st Australian Armoured Division in 1942.
Initial orders allowed for 150 M3 Lights and 250 M3 Mediums to be allocated to
Australia in mid 1941, and in August 1941 deliveries of 46 tanks had been
authorised. However, 36 of these were diverted to an allocation for Russia,
leaving 10 M3 Lights to be delivered by the end of 1941. Deliveries increased
during 1942 and by the middle of 1943, and the total number of Stuarts
eventually to be held in Australia amounted to around 370 vehicles, of which
some 50 were diesel engined.
The types of Stuarts received were varied, and were in different build states.
Whilst the tanks were generally supplied direct from the United States under
lend-Lease arrangements, a small number were supplied direct from the United
Kingdom and at least one shipment was “Refugee Cargo”, indicating that a
shipment bound for a destination other than Australia was diverted to this
country when the original destination was overrun by the Japanese. The earliest
tanks to arrive were M3s with octagonal, welded turrets and the high commander’s
cupola. Subsequently, the rounded “horseshoe” turret with high commander’s
cupola made its appearance. Both these types were designated Stuart I in British
service, and generally these designations were used. The M3 Diesel was also
received, in small numbers as previously described. Its designation was Stuart
II. The introduction into production of the newer rounded turret with a flat top
and two hatches, and with a turret basket, was known as the M3A1 or Stuart III.
To complicate matters, these turrets were also fitted to M3s without a turret
basket, whence they were known as Stuart Hybrids. Australian documentation
listing local modifications also uses the designations Stuart Hybrid I & II,
indicating that some diesel engined versions may have existed in Australia.
|
|
|
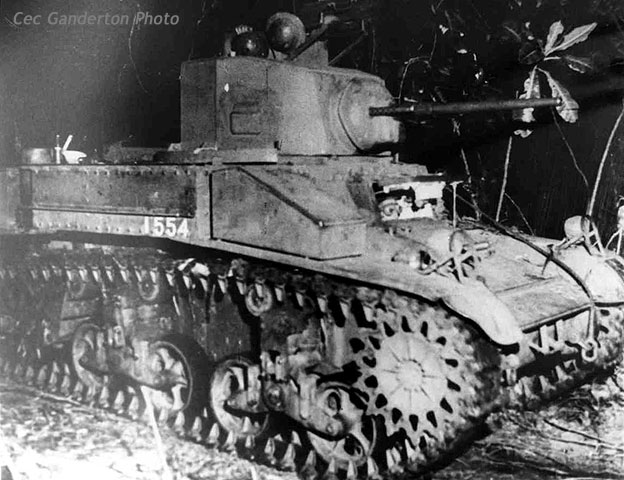
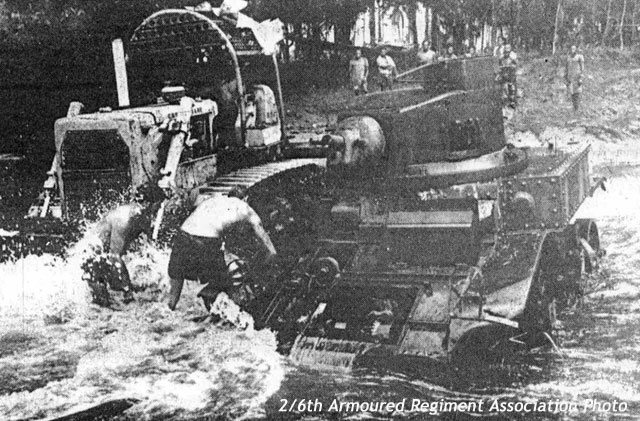
M3 Stuart number 1554. This tank was bogged in the first action and was partially submerged for three days. Later recovered. |
The period from late 1941 until late 1942 was one of considerable changes in
fortune for the Allies, and in Australia there was great confusion over
deliveries allocated and deliveries received, coupled with the fact that ships
carrying refugee cargo arrived at undesignated ports and with cargoes unknown to
local authorities until unloading and sorting took place. Official records
therefore at best can only provide a part picture, and in Australian service the
Stuarts were usually only divided into M3 Light Tank (petrol) and M3 Light Tank
(diesel).
What is for sure is that Australia followed the British lead in trying to
improve the “fightablility” of these tanks, and large numbers of modifications,
generally in accordance with British practice, were authorised for the vehicles
received. Some of the 43 modifications listed in early 1942 were as follows:
|
Fit periscope to Commander’s Cupola | |
|
Fit stop to Cupola Lid and weld up 4 vision slots | |
|
Remove Sponson machine guns and fit blanking plates | |
|
Fit modified engine air intake | |
|
Fit stowage bins and equipment boxes | |
|
Fit turret base ring protectors |
Not all tanks were eventually fitted with all modifications, and variations
existed within regiments and even squadrons.
![]()
In the second half of 1942, the Australian forces in New Guinea had stopped
the Japanese advance on Port Moresby, and had pushed them back over the Kokoda
Track. This had been a brutal and difficult fight, with men and supplies having
to be brought over the single jungle track in mountainous terrain. Sickness,
disease and malnutrition had effect on both sides. In September, the Japanese
landings at Milne Bay had been decisively defeated.
The Japanese had fallen back to the northern area around Cape Endaiadere, Buna,
Gona and Sanananda. Here, substantial defence works were undertaken, with
bunkers dug in at ground level, swamps and dense jungle providing impassable
areas for assault troops, and aerial observation being virtually impossible due
to the tree canopy.
In September 1942, it was decided that tanks were needed in New Guinea, and the
1st Australian Armoured Division, which had just completed a series of exercises
in the north west of New South Wales, was tasked to provide that support. The
original choice was the 2/5th Australian Armoured Regiment, but they were
equipped with M3 Medium Tanks. These AFVs were to heavy for any transport then
available in New Guinea, so the choice fell on the 2/6th Australian Armoured
Regiment, who were fully equipped with M3 Light Tanks. Initially A Squadron was
deployed to New Guinea, and arrived in Port Moresby on 25th September 1942,
where they were given three tasks:
|
Airfield Defence | |
|
Mobile Reserve | |
|
Defence of Bootless Bay and Borio Areas against enemy landings |
Shortly after, the remainder of the regiment moved to New Guinea. The regimental
headquarters and C Squadron moved to Port Moresby, and B Squadron moved direct
to Milne Bay.
|
|
|
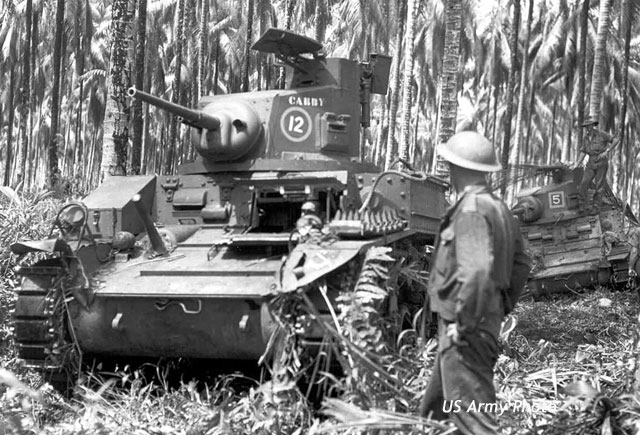
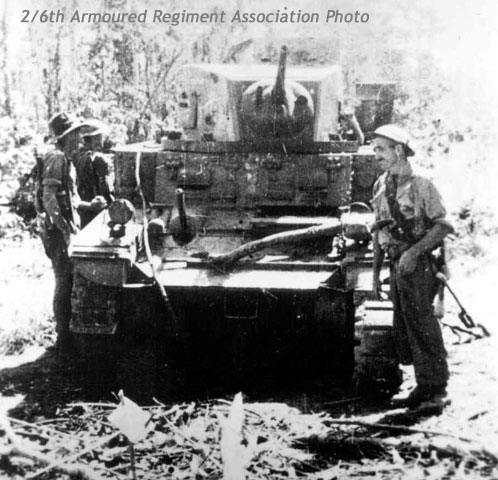
A C Squadron M3 assisting a B Squadron M3 from a bog. Note the turret protector ring, spare track link stowage, and grousers fitted to the front vehicle. The AA MG mount is fitted to the turret. |
The threat to Port Moresby had lessened by this time and the Regiment trained for operations as well as having troops employed as stretcher bearers unloading wounded men from aircraft, working as despatchers in air resupply aircraft and labouring on the wharves or making roads.
![]()
Attempts to dislodge the Japanese at Buna defied the efforts of Australian
and US troops, and following a debacle where infantry machine gun carriers were
used as tanks and were shot to pieces, it was decided that the tanks would get
their chance to be used. Four tanks of C Squadron had already been shipped to
Oro Bay, and were offloaded onto lighters which were then towed by launch to
Hariko. This was done at night as the Japanese still had air parity at least.
The tanks landed at Hariko and were moved along the beach at low tide, with low
flying aircraft drowning the noise and the incoming tides removing traces of
their tracks. Four tanks from B Squadron were also moved up from Milne Bay, and
these eight tanks constituted a composite X Squadron under the command of
Captain Norm Whitehead.
The attack on 18th December 1942 would be led by the 2/9th Australian Infantry
Battalion supported by 7 tanks. The US 128th Regiment, the 2/10th Australian
Infantry Battalion with one tank would comprise the reserve. The 2/9th battalion
would attack with three companies forward. Three B Squadron tanks commanded by
Lieutenant McCrohon, Sergeant Jack Lattimore and Corporal Evan Barnett would
support the right flank company. The centre company had three tanks commanded by
Lieutenant Curtiss, Sergeant John Church and Corporal Cambridge. The seventh
tank was commanded by Corporal Tom Byrnes and had Captain Whitehead on board.
This tank was to the rear of the two troops of forward tanks and was to act as
the control tank.
After crossing the start line at 0700 hours, the tanks moved at an infantry
pace, with the infantry moving beside or close behind. This work was not what
the Stuarts were designed for and continuous slipping of clutches and low engine
revs caused the drivers much trouble. Where the tanks encountered Japanese
bunkers, these were attacked by the tanks at point blank range and finished off
by the infantry throwing in grenades. The left flank company, having no
supporting armour, faired badly and suffered many casualties. As Captain
Whitehead had left his troop leaders to run their own battle, he was at a loose
end until the request for tank support came from the left flank company. Turning
west, he came up against three strongpoints. The southern bunker was despatched
with five rounds and turning to take on the next, the gunner‘s sights fogged
over. Whitehead had his face pressed against one of the turret vision slits when
a Japanese soldier leaped onto the tank and fired his rifle against the slit.
Severely wounded by shrapnel from the armour and the bullet, Whitehead fell into
the tank. As the tank turned to evacuate him, the gunner fired a 37mm round at
another Japanese firing from behind a tree.
|
|
|
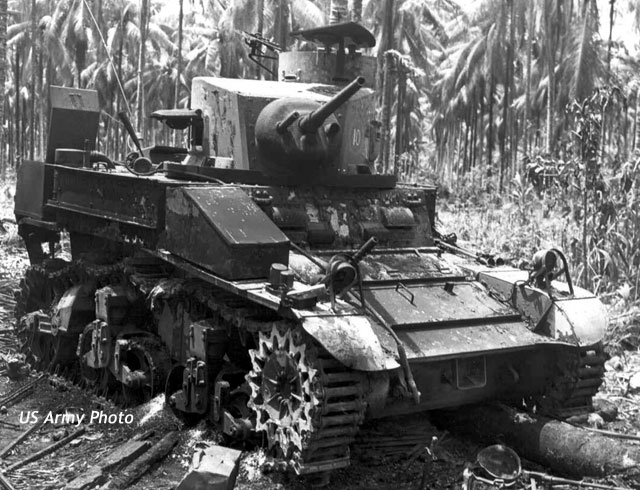
A burnt out M3 Stuart with rounded horseshoe turret, carrying the markings of 10 Troop C Squadron. The tank has bellied on a log, and the rubber track blocks are completely burnt away. Possibly Lieutenant Curtiss’s tank, hull number 2033 |
The Regiment’s Commanding Officer, Lieutenant Colonel Ralph Hodgson, took over
the tank after Whitehead was removed. Returning to the battle, he was true to
his teaching during training, and had his head out of the commander’s cupola to
better see the battlefield. In any case the vision slits had been earlier
damaged and were useless. Unfortunately, a machine gun burst on the vehicle
wounded him, and so by 1000 hours both the Regimental and Squadron commanders
were casualties.
Back on the right flank, Lattimore’s tank had bellied on a coconut log.
Responding to a call, Corporal Barnett moved to Lattimore’s position but had run
out of ammunition. Moving quickly to the rear (only a matter of 500 yards) and
Barnett replenished and returned. The Japanese started to light fires under
Lattimore’s tank, and so Barnett’s gunner machine gunned them off. The crew were
saved. In the centre, Lieutenant Curtiss’s tank bellied on a stump and again the
Japanese tried to burn them alive. Under cover of infantry small arms fire,
Curtiss and his crew escaped, but the tank burned out. Corporal Byrnes’s tank
was hit by a magnetic mine and destroyed.
|
|
|
A rear view of the tank pictured above. The rear has not burned as much, and some track links are intact and are fitted with grousers. Note the open stowage boxes and the sign of the 1st Australian Armoured Division. |
In a gallant final effort, the infantry formed up at 1400 with several of the
tanks and began a final assault. Using very pistols to indicate targets to the
tank crews, the infantry moved forward, and the reserve platoon used Bren Guns
to sweep the tree tops. The attack succeeded, and the Japanese broke, leaving
their bunkers only to be gunned down by the Australians. It took another six
days to reach the ultimate objective, Sinemi Creek, which was only 2500 yards
from the start line.
On 24th December 1942, a fresh advance started to the west. Four tanks commanded
by Lietenant McCrohon were in support. The Japanese had used antaircraft guns
against allied aircraft, but these had not been fired recently. The tanks were
advised these guns were well to the south. In the first hour, three tanks fell
to three Japanese dual-purpose anti-aircraft guns. Lattimore’s tank was hit in
the co-driver’s position, killing him and severely wounding Lattimore. The
second tank had its tracks blown off and the third, commanded by Corporal
Barnett took a round through the turret, killing the gunner and severely
wounding Barnett. The fourth tank slipped into a shell crater.
In the meantime, a further 11 tanks of B Squadron left Milne Bay and were moved
to the area. An attack on 29 December was ill-conceived and executed, using only
four tanks which had only just arrived in the area. A further attack on 1st
January 1943 was more successful and six tanks with three in reserve were used.
The infantry however were exhausted, and against strong bunkers the attacks
slowed. The actions were very fierce, and one tank had its radio put out of
action and was set on fire. The crew remained with the tanks, putting out the
fire and fought from the stationary vehicle for five hours.
The final chapter for the 2/6th Armoured Regiment came on 10th January 1943,
when thre tanks of Lieutenant’s Heaps troop, plus one reserve, supported the
attack of the 2/12th Infantry Battalion at Sanananda. The troop had to advance
line ahead along a narrow track, and after some 60 yards the troop leader’s tank
was hit by four rounds from an unlocated Japanese anti-tank gun. Both the hull
hatches were blown open, and one round penetrated the left sponson. Corporal
Broughton’s tank moved forward to cover the damaged vehicle, but received twenty
rounds of 37mm fire before one round penetrated and wounded the four crew. The
driver, although wounded, managed to extricate the tank and move off with the
wounded. The third tank, commanded by Sergeant McGregor moved forward to support
the troop leader, but his track was cut by a mine. and then set on fire by a
Molotov Cocktail. Both the tank and the four crew were lost. Lieutenant Heap and
his crew finally managed to exit the tank, which had been rendered unserviceable
by the crew, and they withdrew to safety.
This finished the involvement of the 2/6th Australian Armoured Regiment in the
jungle battles. They had proven that armour was an essential factor for the
fight against the Japanese, and although they were equipped with unsuitable
vehicles, had achieved results out of all proportion to their numbers.
The final words for the Regiment were spoken by Major General Ronald Hopkins,
the father of the RAAC:
“It must be recognised that the gallantry and devotion of the officers and men
of the 2/6th Armoured Regiment remained the vital factor in the success of their
operations.”
![]()
The tanks which fought in these actions were all M3 Stuarts, either with
octagonal welded, or horseshoe rounded turrets, both types having the high
cupolas. All tanks were petrol engined.
Three of the tanks are still, more or less, in existence. The Australian War
Memorial possesses one turret and upper hull, one tank less suspension exists at
a Museum in New Guinea, and the third most complete vehicle is located at the
Admiral Nimitz State Historical Park in Austin, Texas. This vehicle is Sergeant
Lattimore’s tank.
At the end of the battles, the LAD Commander, Captain Cyril Diamond, produced a
list by tank (hull) number showing the condition of each tank. Of the 27 tanks
brought to the Buna – Sanananda area, the following summary is made:
|
Tanks at Soputa which are OK 8 | |
|
Tanks at Cape Endiadere which are OK 12 | |
|
Tanks which can be moved but not suitable for fighting 1 | |
|
Tanks from which turrets have been removed 2 | |
|
Tanks lost at Buna 3 | |
|
Tanks lost at Sanananda 1 |
The tanks which had their turrets removed were used for towing and recovery after the battle, and were known as “bobtails”.
![]()
The Stuarts used in New Guinea all carried four digit registration numbers.
These, it is believed, were the manufacturer’s hull numbers. On their arrival in
Australia in 1941 to 1943, the tanks generally carried the British T number,
although a few carried the USA W number. Some received an Australian 10 000
series number, in accordance with the Army Registration requirements in force at
the time, but most did not. It would seem the hull number was used throughout
1942 by many units.
The tanks carried the formation sign of the 1st Australian Armoured Division – a
white battleaxe and fist on a black background. Their unit sign was a white 52
on a red background. As can be seen, most vehicles carried a yellow squadron
sign, square for B Squadron and circle for C Squadron on the turret, with the
troop number inside the device usually in white. Those tanks without troop
numbers were squadron headquarter tanks.
The colour of the vehicles has been the subject of much speculation. Most tanks
would have arrived in Australia in either US Army olive drab or British khaki
green. Given that a number of modifications were done to the tanks, that there
are photos of the 2/6th’s tanks in camouflage during their training, it would
seem most were repainted. If this was the case, then the colour would be
Australian Khaki Green No. 3, a similar, but not identical, colour to the
British khaki green
![]()
This article is a composite from many sources, all of which differ in some
detail. There are many after action reports contained in the files of the
Australian War Memorial. A number of personal reports have also been used. The
final result is my own doing, and any mistakes are mine alone.
Thanks to Mr Douglass Hubbard, Superintendent of the Admiral Nimitz State
Historical Park, Texas, who was kind enough to answer my correspondence in 1983.
Thanks to Mr Norm Grinyer, of the 7th Australian Divisional Cavalry Regiment
Association who supplied some photos of the Stuarts at Sanananda.
My biggest thank you, though, is to the men of the 2/6th Australian Armoured
Regiment Association. Many of these men have been my friends for a number of
years and many have unwittingly contributed to this story with their
recollections and discussions. Only a few can be named, but my thanks goes out
to all the members:
Kevin “Bunny” Austin, Evan Barnett, Fred Bartley, Cec Ganderton, “Gippo” Green,
Frank Pearson, Lloyd Thomas, and the late Ken Tye.
![]()
Photographs of the tanks in action at Buna are particularly numerous, having been taken by Department of Information Photographers George Silk and Damien Parer. In particular, Damien Parer filmed some movies from the hull gunner’s position of Corporal Evan Barnett’s Tank.
Unfortunately, most of the available photos from Australian sources have had the tank markings permanently scratched fro the negatives as a result of wartime censorship. These can be viewed on the Australian War Memorial’s website.
Some photos do exist of the tanks without their markings being obliterated.
These are from either US sources, or from original photos given to a number of
2/6th members by George Silk and Damien Parer after the actions. Some of these
are included in this article.
![]()
 |
A Stuart at Sanananda. This is believed to be Sergeant Mc Gregor’s tank which was burnt out by a Molotov cocktail. (2-6 06.jpg) |
 |
Sergeant Lattimore’s tank on the dock in Sydney in 1971 before being transferred to the USA. Note the damage to the co-drivers hatch. (2-6 08.jpg) |
 |
The tank which now rests at the Australian War Memorial in Canberra being recovered in 1971, using a dozer to move it onto an Army landing craft. (2-6 09.jpg) |
![]()
Article Text and Photographs Copyright ©
2002 by Paul D.
Handel
Page Created 30 March, 2002
Last Updated 30 March, 2002
Back to Anzac Steel Main Page